Unless you’re buying your boat, docking it, launching it, and storing it all at the same marina (like Woodard Marine), chances are you will need to transport your boat from point A to point B.
Trailering a boat can be complicated, especially if you don’t understand all the requirements or what equipment you need. In this article, we’ll give you a brief overview of everything you need to safely transport your boat and why they’re important.
The right trailer for your type of boat
Boat trailers come in different styles, lengths, and weight limits, so it’s important to make sure you buy one that’s made for your type of boat. Characteristics to consider include:
- Gross vehicle weight rating (GVWR)
- Length and width
- Material (for freshwater vs. saltwater use)
- Style (bunk, roller, keel roller, or float-on trailers)
- Axels (single or multiple, depending on how large your boat is)
- Types of tires, brakes, and lights
If you’re not sure what type of trailer your boat requires, be sure to ask your dealer.
The right class of trailer hitch
If you already have a trailer hitch on your vehicle, it’s important to be aware of its class. Class III hitches are the most common and can typically handle loads up to 5,000 lbs. If the combined weight of your boat, trailer, and cargo is more than that, you will need a Class IV or V hitch (and a large vehicle for towing).
A drawbar and tow ball
You may also need to make sure you’re using the correct drawbar and tow ball for your trailer. The drawbar should be at the right height to make your trailer level with the ground. As for tow balls, trailers typically have the correct ball size engraved on the tongue for easy reference.
Two safety chains
Safety chains hook from your vehicle to your trailer, crossing over once in the middle, under the hitch and coupler. They act as a backup if either your tow ball or coupler were to fail, and will help prevent damage to your boat and trailer (and other vehicles on the road). Remember to purchase a set of chains with a high enough weight capacity for your needs, and check them often for wear and tear.
A balanced tongue weight
You also need to be sure that your trailer has a balanced tongue weight, which is the amount of downward force put upon the hitch. The rule of thumb varies, but it should be somewhere around 10% of the combined weight of your boat and trailer.
Having too much or too little will make the trailer tilt forward (too much) or backward (too little). If the tongue weight is off, your boat can fishtail (too light) or make it hard to steer your vehicle (too heavy).
You can determine the weight by using a tongue weight scale or a vehicle scale. If the numbers are off, you can redistribute the weight of your boat forward or backward to increase or decrease the weight on the tongue.
A trailer jack
A trailer jack goes under the tongue to raise it up so you can connect or disconnect it from your vehicle’s hitch. They come in different lift capacities, so you must make sure to use one that’s able to handle your tongue weight.
Trailer jacks aren’t known to be the longest-lasting towing accessory, so it’s a good idea to regularly inspect yours for wear and keep a spare one on hand.
A trailer electrical plug adapter
A common mistake when trailering your boat is forgetting to bring a trailer plug adapter, which are fairly inexpensive, but serve an important purpose. The plug adapter runs power to your trailer’s tail lights, brake lights, and turn signals. It’s illegal to drive a trailer without working lights, so you could get pulled over if you forget to use a plug adapter.
More importantly, remember that when you’re towing a boat, other drivers likely won’t be able to see the lights on the back of your vehicle. Using a plug adapter to power your trailer’s lights can help prevent an accident.
Depending on your trailer, the adapter plug also powers your trailer’s brakes, making it doubly important not to forget it.
The right kind of vehicle for your boat
It doesn’t matter what kind of trailering equipment you have if your vehicle isn’t physically capable of pulling the weight of your boat and trailer.
You might be surprised that it doesn’t necessarily take a large truck or SUV to trailer a boat; it just depends on the weight of your boat and your vehicle’s towing capacity. Many cars and crossovers are capable of towing smaller boats, especially if you purchased a towing package when you bought it.
Check your owner’s manual or online to confirm your vehicle’s towing capacity (and whether towing is recommended at all). Be sure that your combined boat, trailer, and cargo weight remains safely below the capacity so you don’t risk damaging your car.
Need a trailer or trailering equipment? We’ve got you covered!
If you need a new trailer or trailering equipment in order to safely transport your boat, reach out to Woodard Marine’s service department. We can order just about any trailering equipment you need and give you advice on how to use it!
Send us a message, give us a call at (802) 265-3690, or visit our Parts & Service department at 615 Creek Road, Castleton, VT.
Wake boats and other speed boats are popular with people who love watersports, such as wakeboarding and wakesurfing. But boaters have to remember that they are responsible for their wake. It’s important to practice wake sports in a way that’s considerate to others using the lake, especially when it comes to safety.
The Water Sports Industry Association’s (WSIA) Wake Responsibly campaign highlights three standard recommendations for wake safety. Let’s take a look at what they are and how they can keep the lake fun and safe for everyone to enjoy.
Keep at least 200 feet from the shore & others
A 2015 study showed that 200 feet is the safest minimum distance to stay away to lessen the impact of your boat’s wake. Passing by any closer than this distance can pose a safety threat to nearby boaters and swimmers. Waves created by wakes are much less powerful after 200 feet, reducing the risk of other motor boats or watercraft (including SUP boards or kayaks) rocking and capsizing, passengers falling overboard, or swimmers being struck by unexpected waves.
Another reason for the 200 feet rule is that the waves created by boat wakes can erode the shoreline. Over time, this can have a negative impact on private property, docks, beaches, and the lake’s natural habitat. Keeping your distance from the shore minimizes the effect your wake has on the surrounding area.
Disobeying this recommendation isn’t just unsafe; it could also result in a fine if you’re caught being irresponsible with your wake. And if you cause damage to someone else’s property, they could sue you for the cost of repairs.
Don’t make repetitive passes
In the same vein as the previous recommendation, avoid passing back and forth by one stretch of shoreline too many times in a row. Repeatedly waking in the same area churns the water too much, which can cause both environmental damage to the shoreline and property damage to docks and docked boats.
It’s best to switch up the lines you run often, and return back to a stretch of water only after it’s had the chance to calm.
The 2015 study also found that the wake is more powerful on the surfing side of the boat. It’s considered a best practice to surf on the side farthest from the shore, to further reduce your wake’s reach and impact on the lake.
Be mindful of your music volume
Waking responsibly doesn’t just mean being safe and protecting the environment; it also means being considerate. And being considerate applies to your sound waves, too.
Play your music loud enough so you can hear it, but don’t crank it all the way up. If you can hear it 80 feet back from your boat, it’s likely playing loud and clear for everyone else nearby.
Not everyone goes to the lake for watersports; some would rather relax and enjoy the peace and quiet of being at the lake. Play your music at a respectful volume so it’s not distracting for homeowners, swimmers, anglers, and other boaters, and so it doesn’t disturb nearby wildlife.
Wake responsibly at Lake Bomoseen
As boating and watersports enthusiasts, we love the fun wakeboarding and wakesurfing brings to Lake Bomoseen. But we love nothing more than seeing everyone enjoy the lake, whether they’re kayaking, paddle boarding, fishing, swimming, or just taking in the sights and sounds of the Taconic Mountains.
We hope that you’ll follow these three guidelines during your time at Lake Bomo to make your visit, and everyone else’s, more fun and safe! If you’re interested in brushing up on the guidelines, check out the WSIA’s Wake Responsibly Compliance Exam, a free, 11-question test on water sports etiquette.
Need to rent a boat or water toys? Woodard Marine offers runabouts, pontoons, wakeboards, waterskis, kneeboards, and tubes. Check out our boat rentals!
Getting your boat ready for winter is an important part of boat ownership, no matter where you live, but especially here in Vermont. Winterizing your boat before storing it for the off-season is critical to preventing damage to your boat’s engine or plumbing system while it sits idle in below-freezing conditions.
But should you hire someone (such as our team at Woodard Marine) to winterize your boat or should you try to do it yourself? Let’s review what winterization involves, what we do for our customers at Woodard, and things to be careful about if you decide to go it alone.
What’s winterization?
Winterization prevents your boat from damage due to freezing temperatures, corrosion, mold, and mildew. Just as you would drain the pipes in a camp you were closing it up for the winter, all water needs to be drained from your boat’s engine, plumbing system, and bilge. Any water that sits in your boat over the winter will expand as it freezes and can potentially create cracks in your boat’s components.
Complete winterization usually involves:
- Draining the cooling water from the engine and running antifreeze through it
- Draining water from the plumbing system and bilge, and running winterizing (non-toxic) antifreeze through them
- Cleaning your boat’s hull, propeller, shaft, and other components
- Stabilizing the fuel
- Changing the oil and filters
- Removing drainage plugs to prevent water from collecting
- Removing any accessories from the boat (fire extinguishers, floatation devices, and electronics)
- Covering and storing for the winter
The risks of DIY winterization
Some boat owners would rather take it upon themselves to winterize their boats and save the cost of paying someone else to do it — but you can end up spending more in the long run if you don’t know exactly what you’re doing. Improper winterization can damage your engine and require you to make repairs to your boat before you can get it back on the water next year.
You need to be sure that you’ve drained all components of the engine so they don’t freeze and develop cracks over the winter. Some types of boats are more difficult to winterize than others because they have more complex systems. Wake boats, for example, have a more complicated winterization process because there are more components involved.
If your boat has heaters, ballast pumps, or water tanks for a bathroom or shower, you need to ensure that all of those components are completely drained as well.
It’s also very important to use the correct type of antifreeze. The antifreeze you use in your engine is poisonous and can’t be used to winterize your plumbing or bilge systems because it can taint your running water and the lake. Instead, you’ll need to use special winterizing antifreeze that’s non-toxic.
How we winterize your boat at Woodard Marine
At Woodard, we double winterize every engine by first manually draining the engine, then running it only on antifreeze, and then draining the antifreeze.
As part of our winterization services, we fully prepare your boat for storage. We’ll inspect your battery, stabilize the fuel system and injectors, and check the gear lube and transmission fluid. We’ll then remove your boat’s propeller and inspect the shaft for debris, regrease it, and reinstall it.
Upon request, we’ll also complete an oil and filter change — it’s an optional but highly recommended part of winterization.
Then, if you choose to leave your boat with Woodard, we’ll also shrink wrap your boat to protect it from the elements (and moisture) and safely store it for the winter.
Summary
Winterization is a complicated but crucial process to protect your boat from the elements during the winter months. Improper winterization can cause cracks, broken components, corrosion, mold, and mildew — so it’s important to make sure it’s done correctly. While you can attempt to do it on your own, it’s much simpler and safer to hire someone else to complete the process for you.
At Woodard Marine, we provide our customers with complete winterization services, shrink wrapping, and storage to keep their boats safe all winter long — and ready to set sail first thing when warm weather returns. Call (802) 265-3690 to schedule your winterization today!
At Woodard Marine, we’re frequently asked about Vermont’s rules for boating licenses and boat safety certifications, particularly when it comes to renting boats from us.
In Vermont, a safety education certificate (also known as a Boater Education Card) acts as your boating license. Let’s take a look at who needs one, how they’re earned, and how the rules apply to out-of-state visitors. We’ll also explain Woodard’s company policies on safety education certificates for boat rentals.
Vermont boater safety education requirements
According to Vermont state law, anyone born after January 1, 1974 needs to complete boater safety education and receive a Boater Education Card in order to legally operate a motor boat. Those older are grandfathered in and are not required by state law to have a safety certificate. Everyone can benefit from completing boater safety education, however, and we strongly encourage everyone to get certified.
While you’re free to drive your own boat without a certificate if you were born before 1974, it’s important to note that at Woodard Marine, we require a boating license or safety certificate to rent a boat from us, regardless of age.
You need to be 12 years or older to take an online boater safety education course (or 10 years or older to take an in-person course). If you wish to rent a boat at Woodard, you need to be at least 24 years old.
How to get a Vermont boating license or certification
The course can be completed online through a state-approved source, such as boat-ed or ilearntoboat, or in-person classes (typically given at local schools or fire stations). Online courses cost between $40 to $55 dollars. Classroom courses are typically a little more expensive. To find classroom courses near you, visit the Vermont State Police website.
In-person classes last about 8 hours, while online courses take only a few hours and can be completed at your own pace. The course concludes with a final exam that you must pass in order to earn your certification card.
After completing the course, you’ll receive a lifetime card that you’ll need to carry with you when operating a motor boat. Just like with driver’s licenses, if a law enforcement officer asks for your card and you don’t have it with you on the boat, you may be fined.
Do you need a Vermont certificate if you’re from another state?
Nope! As long as you’ve completed a course approved by the National Association of State Boating Law Administrators (NASBLA) in another state and hold a Boater Education Card, reciprocity rules allow nonresidents to operate a motorized boat in the state of Vermont.
The same rules apply to visitors from Canada; you can drive a boat in Vermont if you hold a Canadian Pleasure Craft Operator Card.
If you aren’t certified and aren’t a Vermont resident, you can either take Vermont’s course, find the official course for your state, or complete the Canadian course. Although all states and provinces participate in reciprocity, some have different requirements. Because Vermont accepts any NASBLA-approved safety course, it might be most practical to take the course for your own state or province, if you plan on boating there as well.
Are you ready to rent a boat?
We hope this article has answered most of your questions around boating licenses and certifications, and what you need to be able to drive and/or rent a boat in Vermont. If you have any additional questions, please feel free to contact our team.
If you meet the state requirements for operating a motor boat and our requirements for renting, take a look at our available rentals, including pontoons, runabouts, fishing boats, and more. We hope to see you on the water!
Lake Bomoseen, the largest lake located entirely within Vermont, is a great place to spend a vacation (or staycation) enjoying the beautiful scenery of the Taconic Mountains. There are plenty of fun things to do in or around the lake, especially if you’re an outdoor enthusiast.
We’re a little biased, but we love Lake Bomoseen. Check out a few of our favorite things to do during the summer season.
Boating & watersports
The obvious (and best, in our humble opinion) way to enjoy Lake Bomoseen is to head out on the water on your choice of boat. If you’re bringing your own, there are several public boat launches from which to set out and transient slip rentals at Woodard Marine to dock your boat during your stay.
If you need to rent a boat for the day, week, or weekend, Woodard Marine offers pontoons, runabouts, and fishing boats for daily rentals (and a 7 day rate if you’re really looking to relax on the water). If you love watersports, we have wakeboards, waterskis, tubes, and kneeboards you can rent along with your powerboat. We also rent out kayaks and SUP boards (stand up paddle boards) for those who would rather go for a relaxing paddle.
Swimming & hanging out at the beach
Lake Bomoseen is an excellent lake for swimming; it’s clean and not too crowded. The lake’s swimming spots include two public beaches, Bomoseen State Park and Crystal Beach. Both are family-friendly and have plenty of amenities.
The sandy beach at Bomoseen State Park, on the west side of the lake, is complete with a picnic pavilion, grills, concession stand, playground, and volleyball net. Crystal Beach, on the east side of the lake, is smaller but also has picnic pavilions, a concession stand, and a playground.
Fishing for the catch of the day
Lake Bomoseen is known for its brown trout, largemouth and smallmouth bass, northern pike, and yellow perch. Other species you might encounter include rock bass, rainbow smelt, pumpkinseed, bluegill, black crappie, common white sucker, and brown bullhead.
If you’re new to the lake, we highly recommend taking a guided fishing tour with our licensed guide, Captain Luke. A half or full day tour will help you get acquainted with the ins and outs of Lake Bomoseen and find the best fishing spots for the species you’re interested in catching.
Camping under the stars
There are several campgrounds in close proximity to the lake, but two are situated right along its shores: Bomoseen State Park and Lake Bomoseen KOA Holiday. Both are family-friendly campgrounds with beautiful views of the lake.
Bomoseen State Park, on the western shore of the lake, has tent, lean-to, and RV sites, a beach, a recreation area, a concession stand, hiking trails, and more.
Lake Bomoseen KOA Holiday, on the northeastern side of the lake, has RV and tent sites, as well as cabins. The campground also features a swimming pool, splash pad, playground, and mini golf.
Hiking the trails
There are plenty of hiking trails in the mountains, forests, fields, and wetlands surrounding Lake Bomoseen. Most are contained within Bomoseen State Park and Halfmoon State Park, including High Pond Trail, Glen Lake Trail, Half Moon Shore Trail, Slate History Trail, and Bomoseen Loop Trail.
The trails vary from easy to moderate, but all offer beautiful views of the lake and the surrounding Taconic Mountains.
Playing a round of golf
If you’d like to spend a relaxing afternoon with a round of golf, Lake Bomoseen has its own lakefront public course. The Bomoseen Golf Club is a 9 hole, par 35 course with beautiful views of the lake.
The course was first opened back in 1933 and includes an onsite pro shop. They even have docks for visitors who prefer to arrive over the water.
Visit us in Lake Bomoseen, VT!
There are so many activities to enjoy in and around Lake Bomoseen, especially during the summer season, and there’s plenty more to explore within a short drive as well.
If you’re planning your Vermont getaway and looking to get out on the water, we can’t recommend Lake Bomoseen enough. To learn more about boat rentals, dock rentals, fishing tours, or our pro shop, visit our website. We hope to see you soon!
Thanks to supply chain delays, material shortages, and increased demand, the boating industry is facing some challenges right now.
The biggest challenge, and the one that will ultimately impact boaters, is rising prices. Let’s take a look at why customers are paying more for boats and what to expect if you’re shopping for a new or used boat this year.
Boats are in higher demand
There has been a boating boom over the past couple of years, mostly due to the pandemic. In light of canceled vacations, closed attractions, travel restrictions, and social distancing guidelines, an unexpectedly large number of Americans decided to take to the water.
In fact, about 415,000 people were in the market for their first boat in 2020, propelling new boat sales to the highest they had been since the 2008 Recession and 13% higher than in 2019. According to the National Marine Manufacturers Association (NMMA), more than 300,000 new powerboats were sold in 2020. In 2021, there was a 4-6% decrease in sales, which still numbered over 300,000. And the momentum is still going strong: the NMMA predicts a 3% year-over-year increase in sales in 2022.
This high demand for boats has been a long-awaited change for the industry, which had never 100% recovered from the Recession. Unfortunately, the boating boom has coincided with COVID-related setbacks and supply chain issues, leading to shortages and production delays.
There are more boaters in the market and fewer boats available for purchase, making for a competitive — and expensive — marketplace.
Boat manufacturers are raising prices
Last summer, the cost to buy a boat rose about 10% from the year before, and prices are still high as we head into the next boating season. Why?
Almost every industry is feeling the effects of inflation, and boating is no different. Manufacturers have been increasing their prices to compensate for supply chain delays, material shortages, and rising material costs.
Supply and demand is also playing a role. With so many new people interested in buying boats, but only a limited supply, manufacturers can raise prices to make up for increased costs and the boats will still sell. A similar situation is happening in the automotive industry.
The used boat market has become more competitive
Rather than wait for new boats to come back in stock, many boaters have opted to buy pre-owned models, which has sent used boat sales soaring as well. According to Boating Industry, over one million used boats were sold in 2020, 8.6% more than in 2019 and breaking the one million mark, which was last reached back in 2006.
Due to increased demand, the price of used boats has also gone up — which is great if you’re in the market to sell or upgrade your boat, but not so great if you’re looking for a steal.
Pre-owned boats are, of course, still less expensive than new models. But buyers should be more careful than ever to select a boat that’s well-maintained and in good condition, to make sure they get the best value for their money.
The impact on boat buyers
Dealers and marinas have had to raise prices on their boats since it now costs more to stock them. This is an unfortunate but unavoidable result of manufacturers raising their prices. Reputable dealers (like Woodard Marine), however, will only raise prices accordingly and don’t engage in price gouging.
If you’re looking for a new boat, you’ll likely have to preorder it and wait months for it to arrive, instead of simply buying one off the lot — so it’s important to shop early if you want to be on the water this summer. Keep in mind that there is some pricing uncertainty, especially with longer wait times, so the price you end up paying once the boat arrives could vary.
Long story short, boating has been — and likely will continue to be — the perfect summer pastime during the COVID pandemic, but the industry hasn’t been immune from inflation, supply chain delays, and shortages. If you’re willing to pay a bit more for your summer fun and order your boat ahead of time (or buy pre-owned), you should be ready to hit the water by the time boating season comes around.
Docking your boat is a complicated task and can’t really be compared to parking a car for many reasons, but most importantly because there aren’t any brakes. As a result, you need to know how to stop forward motion and slowly bring your boat to a stop alongside a dock.

1. Approach slowly
One of the golden rules of boating is to never approach the dock faster than you’d be willing to hit it. There’s no perfect way to slow your boat down quickly, so it’s important to lower your speed far in advance of reaching the dock.
2. Check the current
Take note of what way the current (and wind) is moving, so you understand whether it’s pushing your boat towards or away from the dock. You’ll need to approach more carefully if the current is pulling you towards the dock, while you may need to use more power to get close to the dock if you’re working against the current.
3. Approach the pier at a steep angle
Point your bow towards the middle of your docking space and approach at an angle of about 30-45 degrees. This will enable you to slide into place alongside the dock and to get as close as you can without hitting against the pier.
4. Start shifting gears
When the dock is only about 100 feet away, turn your wheel away from it and shift into neutral. The stern should begin angling towards the pier and your boat should gently drift towards the dock because of its own momentum.
5. Correct the angle
To bring your boat parallel to the dock, turn your wheel towards the dock once again, shift into reverse, and gently apply the gas to help stop forward motion and position the stern correctly. Then shift back into neutral and finish drifting close to the dock.
6. Tie your line
Properly tied lines will keep your boat from moving forward (or backward) after you position it alongside the dock.
7. Turn off your engine
Wait until your lines are completely tied before shutting off your boat, so you can easily reposition your boat if it moves around while you’re mooring.
Summary
Following these steps should help you to carefully approach and position your boat alongside the dock, while coming to a stop in a gradual and safe way.
Docking a boat can seem like a daunting task, but knowing what lines you need to tie can make the whole process run more smoothly. In this blog, we’ll outline how to tie a boat to a dock or in a slip, what lines and equipment you’ll need, the kinds of knots you need to know, and some helpful tips to keep your boat safe and secure.
Prepare your boat
There are several pieces of gear you’ll need in order to properly dock your boat.
- Bow lines (to secure the bow)
- Stern lines (to secure the stern)
- Spring lines (diagonal lines to keep your boat from moving back and forth)
- Breast lines (to aid with boarding and disembarking)
- Fenders (to protect the sides of your boat from the dock or other boats)
- Cleats (attached to your boat and attached to the dock)
The number of lines you need depends on where you dock. For mooring parallel to a dock, it’s common to use one bow line, one stern line, and two spring lines. For mooring in a slip, you’ll likely need two bow lines, two stern lines, and at least one spring line. Each docking situation varies and it’s important to tailor your approach to fit your specific boat and the dock or slip.
If you have your own dock, it’s a good idea to leave your lines tied to the dock cleats (and coiled neatly so no one trips). This will make it quicker and easier to tie your boat to the dock. Just remember to keep enough lines on your boat to dock anywhere else you might stop.
You should have a second full set of lines on your boat. It’s always a good idea to have extra lines on hand anyway, in case one breaks or you need additional lines to better secure your boat in stronger conditions.
Tie a boat to a dock
If you’re mooring parallel to the dock, you’ll need to use one bow line and one stern line to secure either end of your boat, and two spring lines to keep your boat from moving back and forth. Unless you’re docking for an extended period of time or in rough conditions, these four lines are typically enough to safely tie up your boat.
Your bow line should run from the cleat on your bow to a dock cleat ahead of your boat. Similarly, your stern line should run from the cleat on your stern to a dock cleat behind your boat. Your spring lines will run diagonally between your boat and the dock, aft (backwards) from your bow and fore (forwards) from your stern, crossing each other in the middle.
Tie a boat in a slip
If you’re docking in a slip, you will need to tie more lines than you would at a dock. Boats are often backed into slips, meaning that you’ll have the dock on one side and along the stern, and a piling on the other side of your bow. Use the lines to position your boat in the slip so it doesn’t hit into the dock or the boat docked in the other half of the slip.
First you’ll tie two bow lines, one from the boat cleat closest to the dock to the dock cleat near the bow. The other bow line will run from the boat cleat on the other side of the bow to the piling in the middle of the slip.
You’ll then tie at least one spring line, running from a boat cleat near the stern to a dock cleat near the bow; this will help you position the stern relative to the back of the slip, and keep your boat from hitting into the dock.
Finally, you’ll also tie two stern lines, using the boat cleats on either side of your stern.You’ll cross the two stern lines diagonally and tie them off to the opposite dock cleats at the back of the slip. This centers your stern and keeps it from moving back and forth.
If your slip doesn’t fit two boats and you have a dock on all three sides (instead of a piling on one), you’ll tie your boat just as you would if mooring parallel to the dock, but to both sides. You’ll tie two bow lines, two stern lines, and four spring lines.

Tie a boat to a piling or dock post
If you’re mooring in a slip, or at a dock that doesn’t have cleats, you’ll need to tie off your lines to a piling, or dock post. Tie your lines lower rather than higher on the piling to reduce the amount of strain on the wood.
There are several different kinds of knots you can use to secure your line to a piling, including a round turn and two half hitches, a clove hitch, and a bowline knot. A round turn and two half hitches is a common and trusted method that ties the line tightly around the piling. A bowline knot creates a loop that’s tied somewhat loosely around the piling; it’s also a safe and secure option. A clove hitch is another tight knot that can be used instead, although it might be slightly less secure and should be followed by additional half hitches.
Tie a boat with a cleat hitch knot
In order to tie your lines to the cleat hitches on your boat and on the dock, you’ll need to master the cleat hitch. It’s a relatively simple knot that is strong enough to keep your boat safe and secure. The knot is similar to making a figure eight around the cleat and creates friction by securing the rope underneath itself.
For more information on tying a cleat hitch, check out another installment of Boating 101, How To Tie a Boat to a Dock Cleat.
Top tips
#1 Tie lines that are long but tight
To keep your boat from moving around, tie tight, long lines. This might mean skipping a cleat or piling and choosing one that’s further away. Making your lines long is especially important in tidal waters, because long lines allow your boat more freedom to move up and down even with a tight line. Short lines are less forgiving and can hang your boat from the dock, causing it to capsize and damage the dock.
#2 Only tie breast lines temporarily
Breast lines are short lines tied from a cleat on the side of your boat to an adjacent dock cleat. They’re used to bring the boat right up against the dock, making it easier for passengers to board or disembark. Because they’re so short and tight, they should only be used temporarily, until everyone has gotten on or off the boat. This is particularly important in tidal waters — if the tide changes while a breast line is still tied, the boat can hang from the dock and capsize.
#3 Adjust line configuration for your boat or dock
Each boat and dock layout is different, so you’ll need to figure out the configuration that works best for you. For example, you might need to tie bow or stern lines that angle toward (not away from) your boat because of the length of your boat, the available cleats, or the length of the slip.
Summary
It’s important to use the right lines when docking your boat. For mooring parallel to a dock, you’ll likely need a bow line, a stern line, and two spring lines. To dock in a slip, you’ll typically use two bow lines, two stern lines, and a spring line.
For other helpful boating tips, check out more articles on our blog.
Filling up your boat’s tank is a bit more complicated than gassing up a car or truck. There are many simple but potentially life-saving safety precautions you should take before, during, and after fueling your boat. Many of these rules apply whether you’re mooring to a gas dock, towing your boat to a gas station, or using portable gas containers.

What to do before fueling your boat
Reduce the risk of spilling
If you’re at a gas dock or filling up with a portable container, make sure your boat is securely fastened to the dock. The less your boat moves while you attempt to fill it, the better. Using more lines, including spring lines, will add stability.
Ask all the other passengers to disembark and stretch their legs on shore. You don’t need them rocking the boat while you’re trying to fuel up. It’s also safer to have them off the boat should something go wrong.
Take precautions against fire
There are several things you can do to minimize the risks of a boat fire. The first and most important precaution is to shut off your engine. Make sure other boaters nearby know that you’re filling up and ask them to not start their engines until you’re all done. You should follow the same precaution if someone is fueling their boat near yours.
If your boat has any interior space, seal it off by closing all doors and windows. This will help keep any fumes from becoming trapped inside. You’ll also need to make sure all flames (including grills and cigarettes) are put out and all electrical devices (including generators) are turned off.
If you’re filling up portable containers at a gas station dock, fill them up on the ground, not on your boat or truck, which can cause static electricity.
Check for wear and tear
Before fueling, check your lines, hoses, clamps, vents, and tank for any damage, including loose connections, rub spots, cracks, rust, and corrosion. Make sure none of the vents are blocked. If you use portable containers, also check them for any wear.
In addition to checking everything before you start fueling, you should make a more comprehensive inspection of your fueling system a regular part of your routine. It’s better to catch and address any issues before they become a problem.

What to do while fueling your boat
While filling up your tank, keep the nozzle in tight contact with the edge of the tank opening to steady your hand and ground any static electricity. Fill the tank slowly and keep your hands steady to prevent splashes and drips, and keep an eye on your progress to prevent overflow. Keep an absorbent pad close at hand and if you notice any drips as you’re fueling, use it to wipe up the fuel before it hits the water.
If you’re using portable containers, use a filtered funnel to reduce the risk of spilling and to remove any contaminants. Fueling a boat with portable containers can make it tricky to keep the nozzle steady, so when you buy your containers, make sure they’re comfortable to hold.
What to do when you’ve finished fueling your boat
Clean up any messes
Turn the pump off and be careful to hold the nozzle upright while putting it back to prevent spilling any fuel left in the hose. Close the tank tightly and check for any drips. If there’s any fuel on the side of your boat, wipe it up with an absorbent pad and dispose of the pad properly.
Let any fumes dissipate
It’s very important to let all gas fumes dissipate before starting your boat back up. Open all the hatches and ports you closed before fueling and let them air out. If you smell gasoline anywhere on the boat, you’ll need to run your ventilation system or blower for 5 minutes or so before starting your engine. If your boat doesn’t have an interior, you should still wait until you no longer smell any gasoline.
Only once all fuel vapor is completely dissipated should you start your engine, let your passengers on board, turn on any electronic devices, or light any flames.
If you’re using portable containers, it’s also important to store them in a cool, dry, dark place that’s well ventilated and away from the engine or any electrical equipment.

Top fueling safety tips
Don’t wait until you’re running on empty
To be on the safe side, fill up your tank when it drops below the halfway mark. The last thing you want is to run out of gas while away from shore.
Don’t fill your tank above 40%
Gasoline expands as temperature rises, so you always need to leave extra space in the tank.
Stay focused
Don’t use hands-free clips and don’t try to do anything else while fueling up. Obey the no electronics rule — don’t use your phone while at the pump.
Keep a fire extinguisher on board
You should always have a fire extinguisher on your boat and keep it within easy reach.
Fuel during the day
When you get gas during the day, you won’t need additional lighting. Since they’re electronic and could potentially cause a spark, flashlights should only be used to fill up at night in the case of an emergency.
Be responsible about spills
If you do spill fuel, stop the source immediately, thoroughly clean up any affected surfaces with an absorbent pad, and then dispose of it properly. If the spill reaches the water, you will need to tell the dock managers so they can take appropriate action to clean it up.
Summary
If it sounds like there are a lot of rules for fueling up your boat, there are. Each rule has a good reason behind it, however, and each rule is centered around keeping you, your passengers, and your boat safe. Taking a handful of simple precautions and a few extra minutes could be the difference between an enjoyable boat ride and a disaster — so follow these fueling rules, make them a habit, and before you know it, you’ll be practicing them automatically as part of your boating routine.
When choosing a boat, it’s important to understand how much it might weigh, as you’ll need to know how many pounds your boat is before purchasing or renting a trailer or lift. A pontoon boat’s weight depends on its length and the type of pontoon, such as leisure, fishing, or sport.
What is a pontoon boat?
Pontoon boats are recreational boats named after the pontoons (or tubes) that allow them to float. They are usually designed as catamarans, with one tube on either side, but some models have a third pontoon in the middle.
Pontoon decks are flat and feature ample bench or lounge seating for passengers, as well as convertible bimini tops to provide shade and ladders to provide access to the water. They’re sometimes outfitted with extra accessories, like sinks, tables, additional storage, audio systems, fishing chairs, sundecks, slides, and more.
Pontoons are popular with families and boaters who enjoy entertaining guests. In addition to being for cruising, pontoons are also sometimes designed for sports like water skiing, wakeboarding, and tubing.
How much does a pontoon boat weigh?
The average pontoon has a dry weight of about 2,200 lbs. To estimate the weight of a pontoon, a good rule of thumb is to multiply the length of the boat by 100. For example, if your boat is 25’ long, it will weigh about 2,500 lbs.
Pontoons can typically hold about 2,000 lbs in people, cargo, and fuel, so a fully-loaded pontoon can weigh well over 4,000 lbs.
What is dry weight?
The dry weight of a boat is how much it weighs without any fuel in its gas tank or any accessories. This is how much a boat weighs when it’s shipped by the manufacturer.
A boat’s wet weight (as listed by the manufacturer) is how much it weighs with a full gas tank, but wet weight can vary based on added accessories. People and cargo aren’t included in the wet weight.
A full or partially filled tank will add weight, so it’s important to take that into consideration when using a trailer or lift. A gallon of gas weighs about 6.1 lbs; multiply that number by the size of your tank to estimate how much weight fuel will add.

Examples of different pontoon boats and their weights
Each type of pontoon comes in a variety of sizes. They are also often available with packages that add on sport or center tubes, passenger space, more powerful engines, or extra length, all of which can increase weight by hundreds of pounds.
Standard
Standard pontoons come in a variety of seating configurations and lengths (usually between 19’ to 25’). Common seating styles include split bench, lounge, and cruise (a combination of benches and lounges). Different layouts don’t tend to significantly impact dry weight. Standard 22’11” Sweetwater and Monaco pontoons, for example, weigh around 2100 lbs regardless of seating style.
Leisure and Entertainment
Leisure pontoons have features like tables, bar stools, grills, and sinks in typically the same amount of space as a standard pontoon. In order to fit these elements in, some lounge or bench seating is removed — so leisure pontoons can weigh about the same as their standard counterparts. A 22’11” Sweetwater Entertainment has a dry weight just under 2,100 lbs.
Sundeck
Sundeck pontoons have a second level instead of a bimini top, sometimes with a slide off the back. It’s not surprising that they weigh more than your average pontoon: a 25’ Monaco Sundeck comes in at 3,115 lbs (dry weight).
Fishing
Fishing pontoons are typically smaller and have less lounge seating. Instead, they come with multiple fishing chairs, which free up space for angling and don’t add any additional weight. Sweetwater’s fishing pontoons, for example, range from 20-22’ long and have a dry weight between 1,800 and 2,100 lbs.
Performance & Sport
Sport pontoons are faster and designed for watersports. They are made with more powerful engines and tend towards the longer side. Some standard pontoons have optional sport packages that add on sport tubes, faster engines, and length. Although it varies by brand, you can expect a sport pontoon of about 26-29’ to have a dry weight upwards of 3,000 to 3,500 lbs, or more.
Luxury
Luxury, top-of-the-line pontoons pull out all the stops. They’re typically larger (25-28’) and can include a variety of features, such as audio systems, lighting systems, hydraulic-powered bimini arches, premium seating, enhanced navigation systems, windshields, center tubes, greater horsepower, and more. They can easily weigh between 3,000 to 5,000 lbs dry.
Value
Value pontoons are typically smaller (16-22’) than other pontoons and have engines with less horsepower. As a result, they weigh less. Sweetwater’s Xperience line of budget-friendly pontoons have dry weights between 1,450 and 2,080 lbs.
Summary
The weight of a pontoon boat depends on many factors, including length, extra features, and type. Most of the pontoons discussed here have a dry weight of around 2,100 lbs, give or take a few hundred depending on length. Luxury, sport, and sundeck models weigh in much heavier, anywhere between 3,000 to 5,000 lbs, depending on their features.
If you’re interested in buying a pontoon for yourself, explore our current inventory.
You might not consider yourself a very superstitious person, but chances are you observe some without a second thought. When was the last time you walked under a ladder or opened an umbrella indoors?
You might be here, reading this article, because you’ve innocently broken one of the cardinal rules of the water: never bring bananas on a boat.
It sounds silly, but it’s a superstition that’s so old and ingrained in fishing and boating culture that it’s hard to pinpoint exactly what inspired it. There are many theories, all of which work together to explain the real-life dangers of the banana that turned it into a symbol of bad luck.

Bananas and fishing boats
Although the superstition seems to have spread to other types of boats as well, it’s closely tied to fishing boats and the belief that you won’t catch any fish if there are bananas on board. The internet is filled with tales of strict fishing boat captains confiscating bananas (and banana-related items) from passengers and throwing them overboard before setting sail. Many an ill-fated fishing trip, from days when the fish didn’t bite, to near-disasters involving leaking boats, faulty motors, and violent storms, have been blamed on the deceptively innocent Yellow Fruit.
Where did this superstition originate?
The banana ban can probably be traced back to various legends and superstitions held by cultures throughout the Pacific, including Hawaii and Polynesia. The belief that bananas only spell disaster for fishing boats seems to have been firmly established in European culture by the 1700s.
Bananas earned a reputation — deservedly or not — for causing nothing but trouble on board wooden cargo ships. Were they really bad luck, or were they actually just bad for the health of the crew? Let’s take a look at some of the hazardous, inconvenient, or even innocent things bananas did that gave them a bad name.
Surviving shipwrecks
Like the Robinson Crusoe of fruit, bananas were notorious for surviving shipwrecks. Imagine sailing along the high seas and coming upon a large patch of floating bananas, one of the only indicators that something had gone awry with whatever boat they were on. Bananas aren’t particularly sinister on their own, but floating in all their yellow glory above a watery grave? Pretty ominous.
Releasing Methane Gas
Bananas release methane gas as their juices ferment, which isn’t inherently toxic unless it replaces oxygen in an enclosed space (like a ship’s hold). Methane gas is also flammable and can self-combust. Methane wasn’t discovered until 1776, making this phenomenon even more unnerving for colonial crews. Various legends blame bananas for fires, explosions, and gas poisonings, and while they might be more fiction than fact, they’re all serious disasters no responsible captain would want to risk.
Bringing unwelcome passengers
No one wants to share a boat with poisonous spiders, snakes, scorpions, termites, and other pests, but unfortunately, they sometimes came as a packaged deal inside bunches of bananas. The bananas you get at the supermarket are innocent enough, but there was a time when crew members were dying from poisonous bites and termites were chewing away at ships. And if that’s not reason enough to ban bananas, what is?
Spoiling too fast
Bananas start to ripen quickly, and traveling by sea took a lot of time. Merchant ships carrying bananas would sail faster in order to get to port before their cargo spoiled. If they were too slow, the bananas would start to rot, filling the ship with an awful smell. If they were fast enough to save the fruit, the boat moved too quickly for the crew to be able to catch any fish to eat — likely inspiring the notion that bananas on board were bad for fishing.
Spoiling other food
In addition to methane, bananas also release ethylene gas, which makes other fruit around them ripen more quickly along with them. This was an issue for — and likely contributed to the superstitions of — both the Pacific Islanders and the European merchants. Other cargo and provisions would spoil faster than usual, which wasn’t only inconvenient, but also dangerous. No one wants to be in the middle of the ocean with rotten bananas and a spoiled food supply. Starving sailors likely become resentful of the bananas, and can you blame them?
Being a cliché hazard
Slipping on a banana peel seems like an overdone comedy gag now, but according to one of the flimsier theories, it was an issue on cargo ships with messy crew members. Everyone could have simply cleaned up after themselves, but why do that when you can just get rid of the Evil Fruit all together? Bananas seemed to be causing enough problems as it was and another strike against them could only help the banana ban to take further hold.
Offending the fish
According to some fishermen, fish don’t like the scent of bananas and would be repelled if the fishermen or the boat smelled like them. (Or perhaps crews just got sick of the smell of bananas.) Scent does matter to fish — according to Bass Resource, fish have a sense of smell 1,000 times better than dogs. They may have come to associate the scent of bananas with fishermen and scattered. Whether they actually disliked bananas, however, is unknown.

Extreme cases of banning bananas on board
Fast-forward to the twenty-first century, and many fishermen and boaters are still strongly against bringing bananas on board. The fruit, however, has become less of a safety hazard and more of a jinx. Some people believe the banana’s bad luck goes beyond the fruit itself and extends to all banana-related things. The list includes:
- Any food that’s made with bananas
- Anything banana-flavored or scented (artificially or otherwise)
- Anything bearing the word “banana” in its name (e.g. Banana Republic clothing, Banana Boat sunscreen)
- Anything with the image of a banana on it (whether “no bananas allowed” stickers or signs are also banned is unclear)
- Anything currently or previously associated with bananas, such as Fruit of the Loom products (even after the brand removed the banana from its logo after an ill-fated boat outing involving an executive)
- Some Floridians and Hawaiians even consider anything yellow to be guilty by association
Summary
For sailors and fishermen hundreds of years ago, it’s clear bananas weren’t just a sign of bad luck, but were inconveniences at best and deadly hazards at worst. The superstition is now firmly entrenched in boating life and you’d be wise to remember to leave them at home on your next fishing trip. At the very least, don’t try sneaking bananas on board someone else’s boat, or you might get blamed for anything and everything that goes wrong.
For other (and perhaps more practical) tips on boating, check out our blog.
Before you set out on the water, you need to know how to anchor your boat. We’ve got you covered with this step-by-step guide to the anchoring basics you need to know.
What anchors do to secure your boat
Anchors keep your boat from drifting away with the current or wind. They’re usually made of metal, so we tend to think of them as being particularly heavy, but that’s not always the case, especially for recreational boats. Instead, anchors latch onto the bed of a river or lake with arms that dig into the sand or mud. After connecting with the bed, the anchor will tip over due to the tension created by the boat, and in doing so latch into the bottom of the body of water.
How to anchor a boat
Remember: anchor from the bow of your boat, not the stern. It’s possible to anchor from both the bow and the stern to further stabilize the boat, but you should never only anchor from the stern; you could capsize the boat.
Always use a chain that’s about as long as your boat and shackle it to the anchor. On the other end of the chain, connect your rope. The weight of the chain will help ensure that your anchor tips over and grips into the bed. The wind or current should be coming from the direction of your anchor and hit against the bow of your boat, creating tension on the line.
Setting
After dropping your anchor, you’ll need to set it.
To set your anchor, you’ll need to pull your boat in reverse to create tension and lock its arms into the bed. If the anchor doesn’t stay put when you create tension for at least several seconds, you’ll need to start over.
Scope
You’ll need to determine your scope, or how much rope you will need to anchor your boat. Opinions vary, but it’s generally a good rule of thumb to multiply the depth of the water by three to come up with the right amount. Others suggest using seven times the amount of rope as the length of your boat, but this might not be practical if there are many other boats in the area.
Resetting
When the anchor sets, it tips over in the direction of your boat. If your boat is pulled by the wind or current so that it moves to the opposite side of the anchor, the tension will be eliminated and you’ll need to reset the anchor.
Different types of anchors
The type of anchor you use will depend on your type of boat, the underwater terrain, and the weather conditions. There are types of anchors that work best in different circumstances. For recreational boats, the most common are fluke anchors, plow anchors, and scoop anchors. All three work well with sand and mud, and plow anchors also work well with rock.
FAQ
Can you drop anchor anywhere?
No, you can’t drop an anchor wherever you’d like. Local laws and regulations may restrict anchoring in specific locations, including channels, fairways, and near mooring locations in harbors. There may also be restrictions on anchoring for environmental precautions and recreational reasons, and some areas might be too rocky for your anchor to catch, depending on the kind of anchor you’re using.
How do you anchor a boat in deep water?
To anchor a boat in deep water, you’ll need to have enough rode, or line, or reach the bottom. Using the same rule as applies in shallower water, you’ll need at least three times as much line as the depth of the water. While you can use a few different kinds of anchors, claw anchors may work the best in deep water. Attach your anchor to the line using a chain that’s about as long as (or longer than) your boat.
What happens if an anchor gets stuck?
Pull your boat around so you’re above the anchor and the line is running straight. Wrap the line once around a bow cleat (called tailing off) to provide tension, but not too much — you don’t want to tip the boat. If this simple tension doesn’t do the trick, try slowly moving your boat in the opposite direction of the anchor. It’s important to do this gently, or you’ll risk pulling the bow of your boat under. If your anchor still won’t budge, you may have to end up cutting the line and abandoning it.
Need a new anchor or line? Check out our Parts & Accessories Catalog.
There are times when you’ll want to tie up your boat without docking or anchoring it. Luckily, you have one other option: mooring.
Where is it legal to tie up your boat when it’s not docked?
You can’t just tie up your boat anywhere. If you’re not docking it, you’ll need to find another safe and legal way to temporarily secure your boat. There’s only one other legal place to tie up your boat.
Mooring Bouys
Mooring buoys are buoys whose sole purpose is for boats to tie to. Their appearance varies by locale, but they are often white with either an orange or blue stripe.
A Note About Bouys You CAN’T Tie To
It’s illegal to tie your boat to any other buoy, including lighted buoys, hazard buoys, and information buoys. These different types of buoys are in place for navigation purposes, directing boaters where they should and should not go. Tying your boat to one of these would block the buoy and potentially put other boaters at risk.
How To Moor A Boat
There are a few different ways to moor your boat to a mooring buoy, but for smaller, recreational boats, here’s a simple step-by-step guide to follow. Remember: always moor your boat by the bow and never by the stern, which could result in capsizing.
Step 1
Approach the mooring buoy from against the current or wind. Your bow line should be tied to one of the cleats on the bow of your boat.
Step 2
Mooring buoys typically have a pick up line already attached to them that will be floating in the water. When you’re close enough, you’ll grab it using a boat hook and thread your bow line through the loop that’s at the end of the pick up line.
Step 3
Take your bow line and bring it around the outside of your bow, leaving plenty of line between you and the mooring buoy. Tie the other end of your bow line to the cleat on the other side of your bow.
Step 4
You can let the current pull your boat away from the buoy. Once the lines settle, the pick up line will be pulled straight and the buoy should be directly ahead of your boat.
FAQ
What kind of boat is used to tie a boat?
Nylon rope is typically used to moor a boat. It’s both strong and stretchy enough to safely secure your boat.
Can I moor my boat anywhere?
No, you can only moor your boat to a mooring buoy.
What is the purpose of a control bouy?
Control buoys mark restricted areas. They are typically white with orange circles that contain information about the restriction. They may also have a flashing light.
Need new lines or your own mooring buoy? Check out our Parts & Accessories Catalog.
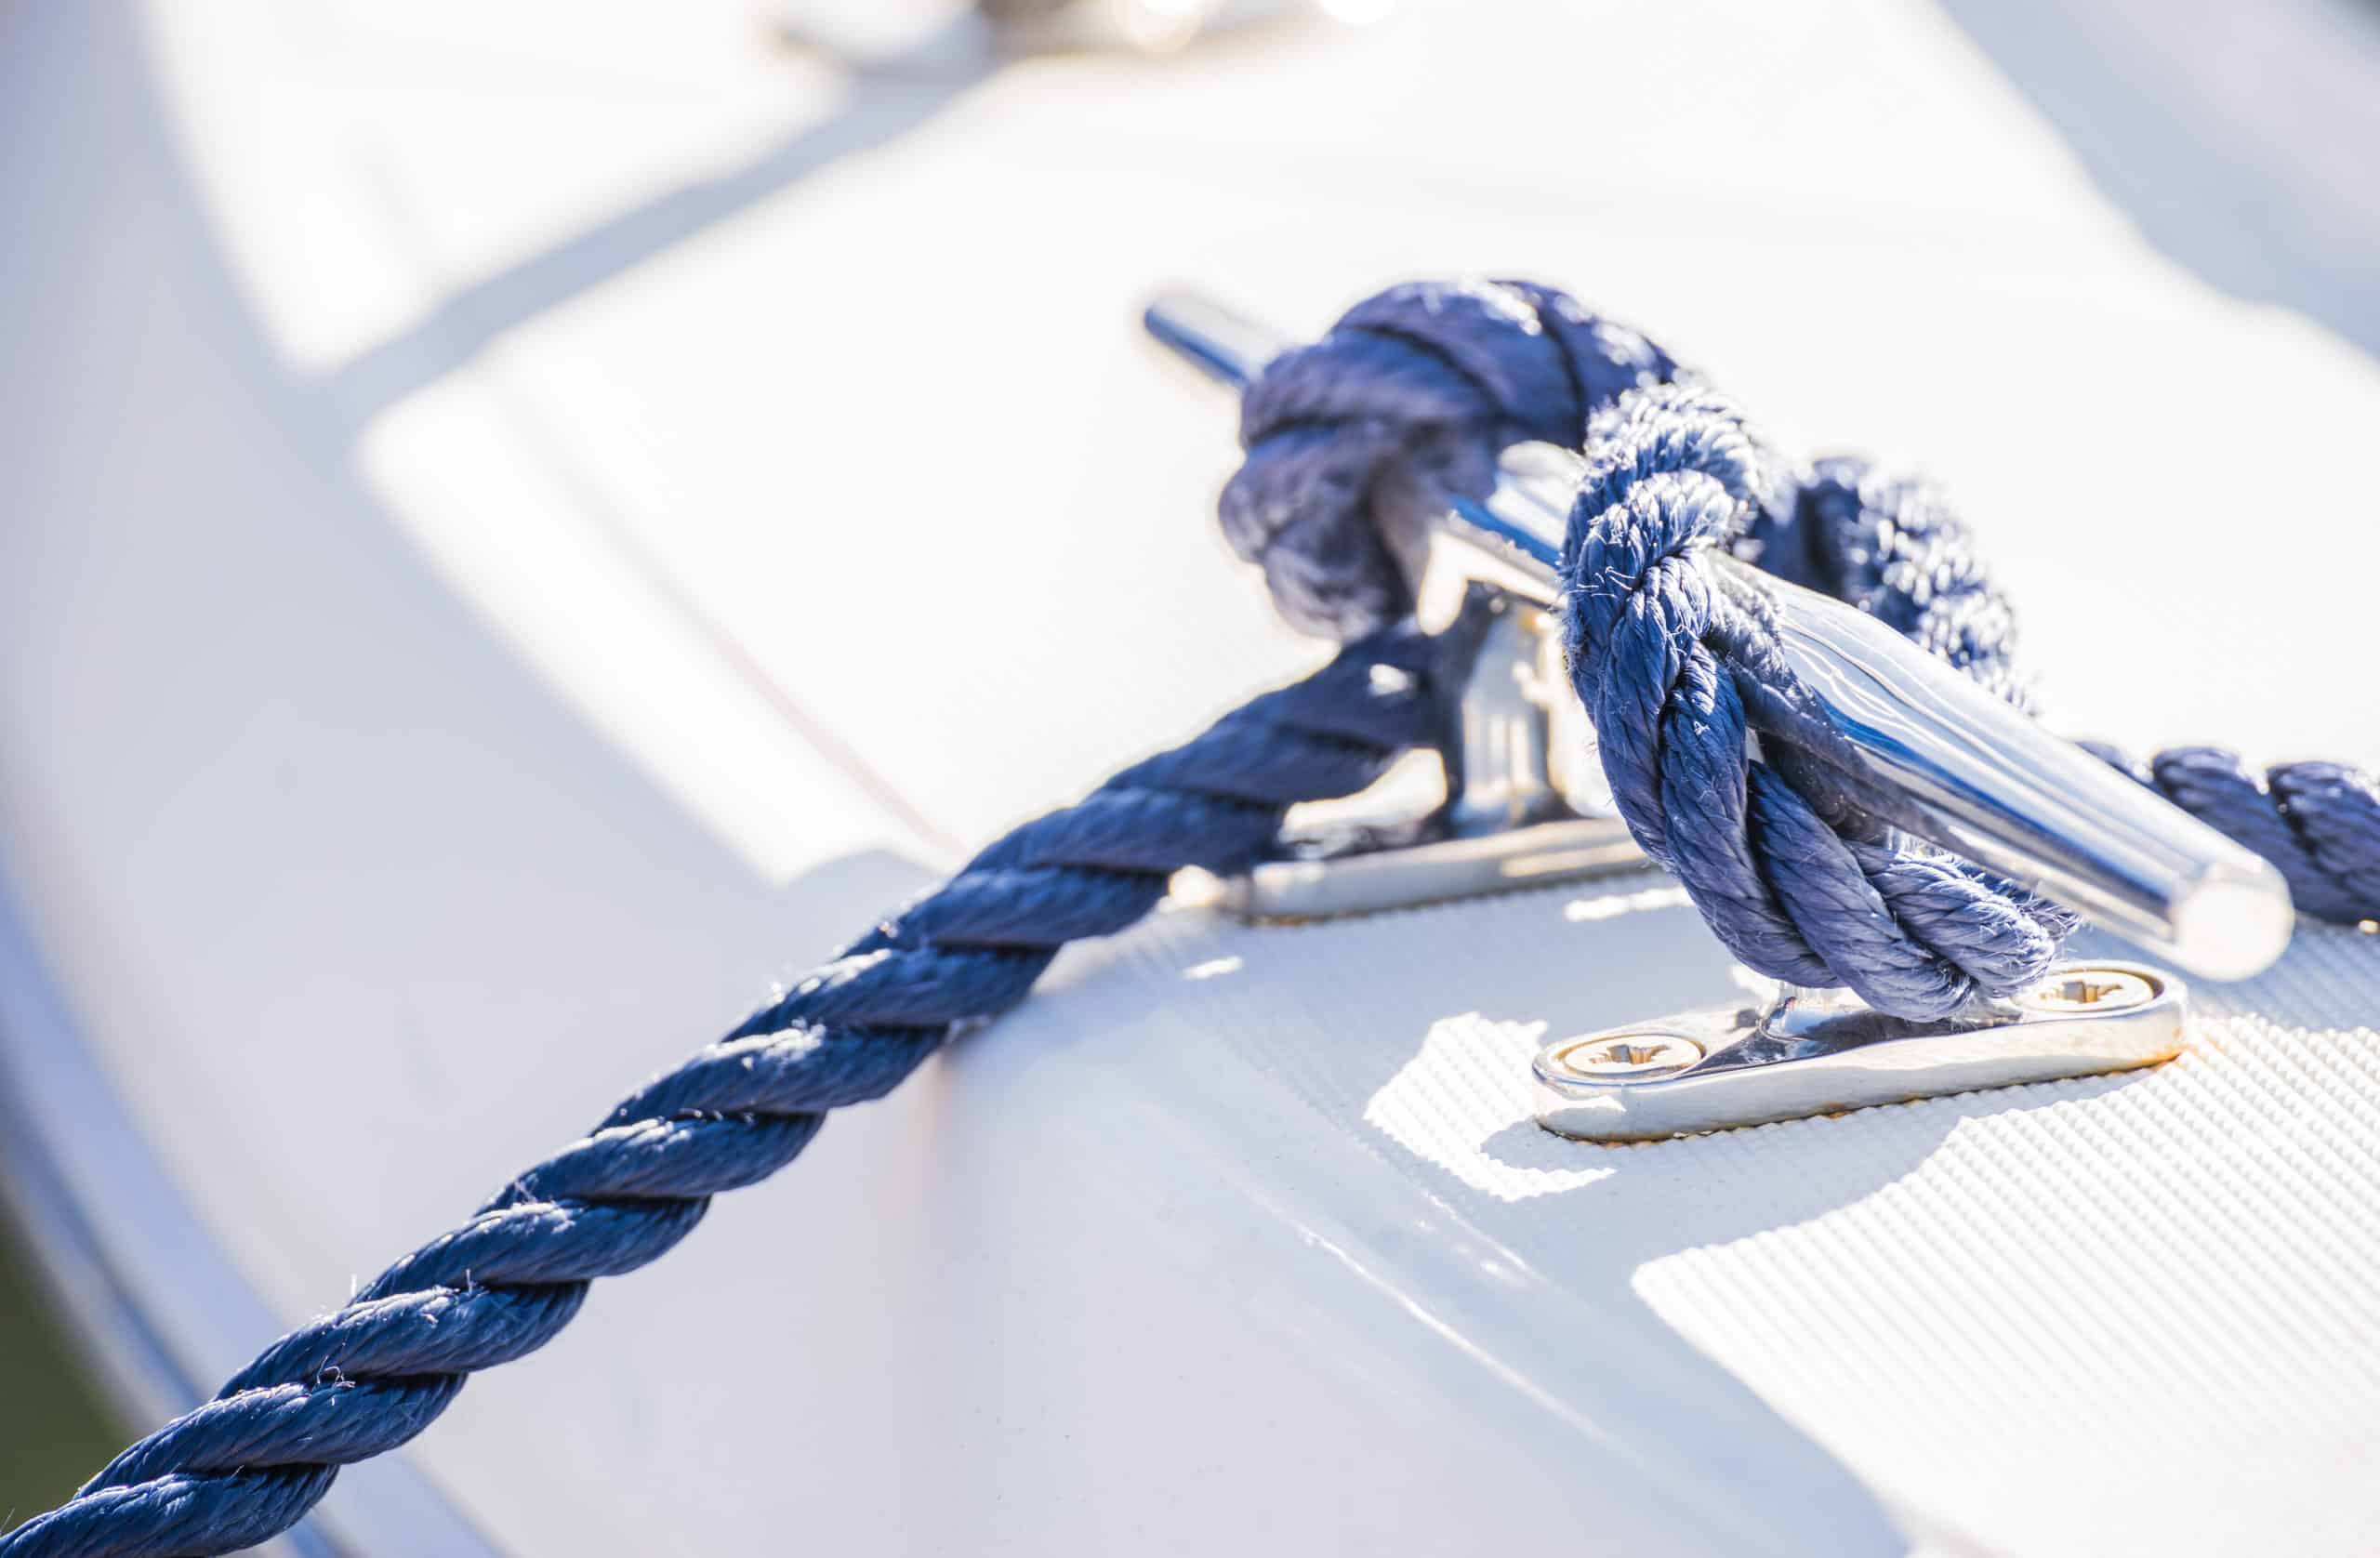
One of the most important things you need to know before setting out on the water is how to securely tie your boat’s lines to dock cleats. Your boat is one of your prized possessions, and the last thing you want is it coming loose from the dock and drifting off on its own.
How to tie a boat…
To a dock
You can tie a boat to a dock by fastening your lines to either dock cleats or, if there aren’t any cleats, to pilings.
In a slip
In a slip, you’ll need to fasten your boat on both sides to keep it in place and stop it from hitting the docks or piles on either side of the slip.
Cleats & Hitches
What is a dock cleat?
So, what exactly are you tying your boat’s mooring line to? A dock cleat is a piece of hardware attached to a dock. The most common type is the double horn cleat, which is shaped like an anvil or handlebar. It’s secured to the dock with a middle post, topped with a bar that runs parallel with the edge of the dock. Dock cleats are typically made from sturdy materials like stainless steel, galvanized metal, wood, or nylon.
Horn Cleats & how to tie a cleat hitch
A cleat hitch is a type of knot. It’s a relatively simple knot that’s strong enough to keep your boat’s mooring line securely fastened to the dock.

Step 1
Take your rope and bring it around the base of the cleat on the side farthest from your boat — this creates the tension you need to keep the knot secure. In other words, if you’re standing on the dock in front of the cleat and your boat is to your right, bring the rope around to the left side of the cleat. If the boat is to your left, bring the rope around to the right side of the cleat.
Step 2
Bring the rope along the front (your side) of the cleat’s base, around to the back, and over the top of the horn closest to your boat, pulling the rope towards you.
Step 3
Loop the rope under and over the other horn of the cleat, creating a figure eight.
Step 4
Double up the remaining line into a loop and twist it once so the loose end is on the bottom. (To do so, twist the rope towards yourself.) Slide this loop over the horn closest to your boat and pull tight towards yourself.
How do you know if you’ve done this right? Look at how the rope crosses over the middle of the cleat. It should look like a neat figure eight with two strands (including the one you’re holding) running side-by-side and one crossing over top of them in the other direction. If this isn’t the case, you’ve twisted the rope incorrectly — unwind and try again, or else your knot may come undone.
Step 5
The end of the rope will be on your side of the cleat. Take the remainder of the rope and wind it into a neat coil beside the cleat, so it doesn’t become a tripping hazard.
And there you have it! Make sure you practice several times before setting out. Once you get the hang of it, tying a cleat hitch is a simple, effective way to make sure your boat is securely attached to the dock.
Cam Cleats
Cam cleats are used for smaller-sized vessels that are only docking for short periods of time. You don’t need to know any fancy knots for cam cleats — just pull the line between the cams, then they’ll lock it into place.
Lines
Stern Lines
A stern line connects the stern of the boat to the dock cleat behind the boat, running at a somewhat diagonal line outward.
Bow Lines
A bow line connects the bow or the stern to the dock cleat ahead of the boat, running at a somewhat diagonal line outward.
Breast Lines
Breast lines are short lines used to keep your boat right beside the dock, making it easier to get on and off the boat. The lines run at a 90 degree angle and should have no slack.
Spring Lines
A spring line runs diagonally from either the bow to the dock cleat nearest to the stern, or from the stern to the dock cleat nearest to the bow, and keeps the boat from moving back and forth. It’s also used to take some of the pressure off your other lines.
There are two kinds of springs lines; AB (after bow) and FQ (forward quarter). AB spring lines run from the cleat on your bow to the dock cleat your stern line is tied to. FQ spring lines run from the cleat on your stern to the dock cleat your bow line is tied to.
FAQ
What is the difference between mooring and docking?
When mooring your boat, you’ll use ropes to attach your boat to a mooring buoy, which is in turn anchored to the bottom of the body of water. Docking involves fastening your boat to a dock along the shore.
How do you tie a boat to a dock without cleats?
If necessary, you can use a bowline knot around one of the dock’s pilings. To tie a bowline knot, you’ll loop your rope over the piling, holding the end in one hand and the main line in the other. Then, make a small loop in the main line and thread the end down through it. Then pass the end of the rope around the main line and right back up through the hole, and pull tight.

What is the best way to tie up a boat?
In terms of knots, the cleat hitch is the best way to tie up a boat. If you’re wondering how many lines you’ll need, that depends on the weather conditions and the duration of time you’re docking for. Using stern, bow, and spring lines is typically a safe bet.
Need a place to dock your boat (and show off your new docking and cleat hitching skills)? Learn more about our dock installation and slip rental services.